Saturday, March 4, 2017

White Bread "Perfected".

I am a white bread snob.  Growing up, we ate Wonder Bread. Soft, delicious, fluffy goodness.  We didn't eat the "store" brand. Gross.
There were many attempts to make a copycat version of the best bread....to no avail.  I've tried a zillion (okay, a lot) recipes and none of them has lived up to the real deal...until today!

I found a recipe somewhere and have been messing with it for awhile. I use SAF Instant Yeast and love the results I get. I alos use the sponge method to get even better results. What does that mean?  Sponging is mixing your liquid, sweetener, yeast, and flour together to rise for about 30 minutes before you add the rest of the flour. Better taste, better texture, better bread. Today was my second test run to make sure it was "worthy" of it's title.  It totally is. Soft, fluffy, even crumb, beautiful crust. Perfection. It stays soft for about 5 days...if it lasts that long!
 I make it in my Bosch so the recipe makes 4 loaves.
You could cut the recipe  in half and make it in your Kitchen Aid....but if you are really wanting to make bread for your family, save your pennies and buy a Bosch!  Best machine I've ever had.  
I give you,
White Bread Perfected

You will need:
4 c. warm water
3/4 c. sugar
3 T. SAF Instant Yeast
Place these ingredients in your mixer and mix them up.  Let them sit for a few minutes to proof. Technically, you don't need to do this and could mix the flour in now but old habits die hard with me.

When the yeast mixture is bubbly, add:
 4 cups of  bread flour
 Mix until a batter is formed.  It should look like pancake batter.  Cover and let the mixture rest for about 30 minutes. This is the "sponge" method I talked about.  After the 30 minutes, your batter will have risen a lot....like double to triple in volume.  Don't freak out....just turn on your mixer and deflate it.
Now next step.
Add:
 1/2 cup oil. I use vegetable oil, melted coconut oil. Whatever.
1 T. salt
Enough flour to make a nice soft, dough; around 5-6 cups.
Start mixing the flour in 1 cup at a time until your dough starts to clean the side of the bowl.
When that happens, knead the dough for 5 minutes.  I do this on Speed 2 in the Bosch.
The dough will be soft, but not sticky after kneading.
Turn out onto a greased counter top and divide into 4 loaves. I never turn my bread out onto a floured surface....it makes it dry and tough.
Let the loaves rise until double and bake in a 350 degree oven for 30-35 minutes.

You can also use this dough for  fantastic cinnamon rolls, dinner rolls, hamburger buns, etc.

Wednesday, January 25, 2017

Electric Pressure Cooker Fantasticness!


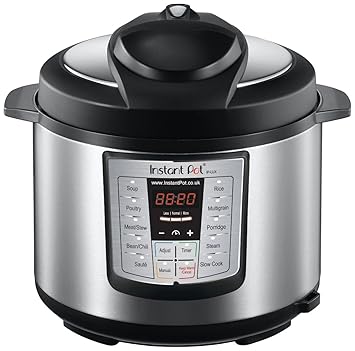
I have had about 3 Electric Pressure cookers in the past 5 or 6 years.  I love mine and I use it ALL the time.  My newest favorite is the Instant Pot.  It is a multiple use appliance that allows you to make yogurt, slow cook, and pressure cook.  Here are a few tips for using your EPC and some recipes that are just plain good!
Image result for Instant Pot
Using your Electric Pressure Cooker
1.     Read your instruction manual!  There are lots of EPC’s and there may be different requirements for use.
2.     Follow all safety guidelines. Always check that your vent is clear. Always add oil or butter to starchy foods.
3.     Always put at least 1 cup of liquid in your EPC.
4.     Never overfill your EPC.
5.     Don’t leave your EPC unattended…i.e. don’t go out of the house to the store.
6.     DO NOT CAN in your EPC…even if the instructions say it’s okay!
7.     Practice, Practice, Practice using your EPC! 
EPC uses high/low pressure to cook your food faster.  They are 100% safe when used correctly. 


PC Mac and Cheese

1 pound pasta
4 c. water
2 T. butter
1 t. salt
Cook on high pressure for 4 minutes. Use Quick Release (QR) . When pressure is all gone add :
1 12 oz. can evaporated milk
2 c. shredded sharp cheddar
2 c. shredded Monterey Jack
Mix until melted. Let sit for about 5 minutes to thicken and serve.
You can use whatever cheese your family loves.


Chicken Taco Meat
Chicken breasts or thighs
1 cup salsa
½ cup water
½ pkg. taco seasoning  or your own taco spices
Cook on high pressure for 25 minutes….35 minutes if using frozen chicken. Use NPR (natural pressure release). When pressure is gone there will be lots of liquid in the PC. Drain out most of the liquid.  Shred the chicken with 2 forks. Add the rest of the taco seasoning, more salsa if desired, and serve.

Mexican Beans
3 cups soaked pinto beans. You can use un-soaked beans..it just takes longer.
6 c. water
2 or 3 dried chilies. I use chili de arbol
2 bay leaves
¼ c. chicken broth powder. I use the Caldo from Knorr. It’s in the Mexican section.
1 T. garlic
Chopped cilantro, if desired.
Cook on high pressure for 45-50 minutes.  Use NPR. Adjust seasoning, take out the bay leaves and chilies.  Serve.

Hard-cooked Eggs Perfecto!
Put a rack in the EPC.  Place as many eggs in the PC as you desire.
Cook on high pressure for 8 minutes.  As soon as the time is up use the Quick Release. When pressure is gone, take eggs out and put into cold water.  Let sit for a few minutes and peel.  Perfecto infinity!  This works for my FRESH eggs!


Brown Rice
2 c. brown rice
2 ½ c. water
1 T. butter or oil
1 t. salt
Cook on high pressure for15 minutes. Use NPR.
Pulled Pork

Boneless country-style pork ribs
1 c. water
Garlic
Salt
Pepper
½ cup BBQ sauce

Cook on high pressure for about 40 minutes.  Drain excess liquid and shred the meat.  Add your favorite BBQ sauce and eat on a bun.

Sunday, August 7, 2016

Wedding Special Sauce~BBQ deliciousness.

I am a lucky Mom.  Two of my three boys are getting married this summer. Shane and Lynsey were married just yesterday in the family barn that my husband has been preparing for a few months.  Ryan and Sydney will be married in September in Utah. Better still is the fact that I get two girls in the deal as well as 2 puppies.
 When Shane and Lynsey got engaged, the boy asked me to make pulled pork sliders, deviled eggs, potato salad and baked beans.  I said " Sure, No problemo!  What the heck was I thinking?  We paired it down to the sliders and called it good.  And good it was!  I cooked  70 pounds of pork the week before the wedding and threw it in the freezer.  What a time-saver and lifesaver!  I still have a half-gallon of the Special Sauce in the freezer for later! Yum.


 The thing that makes the slider is the sauce!  I have experimented with lots of sauces and have come up with a great tasting, tangy, sweet sauce based on a recipe I found here.  It is a fabulous starting point for customizing your sauce to make it your own....and that is exactly what I did.  To make it exactly what I wanted I added some yellow mustard, a little bit more brown sugar, and the secret ingredient......strained homemade boysenberry jam!  To die deliciousness!  


Try it...you'll love it!

Wedding Special Sauce
adapted from Mel's Kitchen Cafe
Makes about 7 cups.

  • 2 cups ketchup
  • 2 cups tomato sauce
  • 1 1/4 cups brown sugar
  • 1 1/4 cups red wine vinegar
  • 1/2 cup yellow mustard
  • 1/2 cup molasses
  • 3 T. butter
  • 4 t. hickory flavored liquid smoke
  • 1/2 t. onion powder
  • 1/2 t. garlic powder
  • 1/2 t. chili powder
  • 1 t. smoked paprika
  • 1/2 t. celery seed
  • 1/4 t. cinnamon
  • 1/4 t. cayenne pepper
  • 1 1/2 t salt
  • 1/2 t. black pepper
1/2-3/4 cup strained boysenberry or blackberry jam. (Straining gets the seeds out.)

In a large saucepan, mix together the liquid ingredients. Add the spices. Mix well over medium heat. Bring to a boil, reduce heat and simmer for 30 minutes. Stir it every once in a while....it will stick to the bottom if you aren't careful.  The sauce thickens as it cools.
When cooled, the sauce can be frozen. Thaw in the refrigerator and use as needed.

Delicioso.  You can use apricot jam, orange marmalade, raspberry or marionberry jam, or anything else that suits your fancy to make it different. You can also adjust the spices to your own taste as well.

Tuesday, July 5, 2016

Mango Freezer Jam! Updated!


I became a Master Food Preserver through Washington State University Extension 6 years ago!  What a fantastic journey! The MFP Program is a great course for anyone that wants to help others learn about preserving foods and to learn current, safe information about canning, freezing, drying, pressure canning, food safety, etc. We did hands-on learning each week about the area we were focusing on. When I finished I was so excited to be qualified to teach about what I had learned and have continued to learn! Anyway...I digress! This was a favorite lesson. We learned all about Jams and Jellies; banana jam, apple pie jam, and my new favorite, Mango Freezer Jam! It is heavenly! You must try it NOW!  Yum!

Check with your local Extension office to see if the Master Food Preserver program is offered in your area. It is a great way to connect and serve your community while making friends along the way.


Mango Freezer Jam


3 c. mango pulp-mashed....it took about 4 good-sized mangoes


1/4 c. lemon or lime juice-the bottled kind. I used lemon...but next time I will use lime.


5 c. sugar


3/4 c. water


1 pkg. regular pectin-not low-sugar or "freezer jam" pectin. I used MCP.


Put the pulp in a bowl with the lemon juice and sugar. Stir well. Let sit for 10 minutes.


Put the pectin and water in a saucepan and bring it to a boil. Boil for 1 minute. Pour over the mango mixture after the ten minutes has passed. Stir for 3 minutes or so until the sugar is dissolved.


Pour into half-pint freezer containers, leaving 1/2 inch headspace. Makes 7 half-pints.


Place in freezer. GO and LICK OUT THE BOWL! YUM!

Mango Freezer Jam! Updated!


I became a Master Food Preserver through Washington State University Extension 6 years ago!  What a fantastic journey! The MFP Program is a great course for anyone that wants to help others learn about preserving foods and to learn current, safe information about canning, freezing, drying, pressure canning, food safety, etc. We did hands-on learning each week about the area we were focusing on. When I finished I was so excited to be qualified to teach about what I had learned and have continued to learn! 
 This was a favorite lesson. We learned all about Jams and Jellies; strawberry jam, apple pie jam, and my new favorite, Mango Freezer Jam! It is heavenly! You must try it NOW!  Yum!

Check with your local Extension office to see if the Master Food Preserver program is offered in your area. It is a great way to connect and serve your community while making friends along the way.


Mango Freezer Jam


3 c. mango pulp-mashed....it took about 4 good-sized mangoes


1/4 c. lemon or lime juice-the bottled kind. I used lemon...but next time I will use lime.


5 c. sugar


3/4 c. water


1 pkg. regular pectin-not low-sugar or "freezer jam" pectin. I used MCP.


Put the pulp in a bowl with the lemon juice and sugar. Stir well. Let sit for 10 minutes.


Put the pectin and water in a saucepan and bring it to a boil. Boil for 1 minute. Pour over the mango mixture after the ten minutes has passed. Stir for 3 minutes or so until the sugar is dissolved.


Pour into half-pint freezer containers, leaving 1/2 inch headspace. Makes 7 half-pints.


Place in freezer. GO and LICK OUT THE BOWL! YUM!

Saturday, July 2, 2016

Fresh Apricot Pie

Nothing says summer more than fresh local fruit!  I consider myself blessed to live in the Pacific Northwest with it's bounty of fresh fruits and vegetables.   Apricots are a summer treat and putting them in a pie is a family tradition I intend to keep and pass on to my two new daughters-in-law that are joining our family this summer!

 My Mom taught me how to make this pie....without a formal recipe. We used the recipe from the old Betty Crocker cookbook for the pie crust .  I am a good pie crust maker but.....I have started to use the Trader Joe's Pie Crust.  Simple to use and it's a darn good crust. Perfect to have in my freezer.  
The apricots are firm, ripe fruits that I pit and quarter.  I add sugar, flour, a pinch of salt, and I tried a new addition of Penzey's Pie Spice.  Wow!  The Pie Spice is a combination of cinnamon, vanilla sugar, mace, ginger, nutmeg, anise, and clove.   Fantastic flavor.  I hope you'll give it a try and see exactly why I love this pie!


Summer Apricot Pie

4-5 cups fresh apricots, pitted and quartered
1 1/2 - 2 cups of sugar~depending on the tartness of the apricots.
1/3 cup flour
2 t. Penzey's Pie Spice or cinnamon 
1/2 t. salt
Mix filling well in a large bowl and let it sit for about 15 minutes to make some juice. 
After 15 minutes, pour filling into a 9-inch pastry lined pie pan.  Dot with butter, about  2 tablespoons. Add the top crust. Crimp the edge and vent the top of the pie. Brush with milk and sprinkle with coarse sugar.

Bake at 400 degrees for 15 minutes. Reduce heat to 325 degrees and continue to bake for 30-35 minutes until you see juice bubbling out the top.


Monday, April 4, 2016

Fried Chicken~My way!


I love fried chicken.  I ONLY love it the day it's made....not.cold.  I know I am weird.  We grew up eating fried chicken a lot.  It was crispy and crunchy...made in a cast iron frying pan and NOT finished in the oven. My Mom made it the way my Grandma made it.  I make it the same way~the right way!  My Dad would always fry up the heart and gizzards.  Delicious.  Some days I throw a batch of gizzards on to fry just for me. MMMMM.  Many days I fry up a bunch of legs....tonight is one of those days!  Good fried chicken takes time.  Don't rush it....it will be worth it!

Buttermilk Fried Chicken

1 cut-up fryer or chicken pieces of your choice, i.e. legs, thighs, etc.
2 c. buttermilk
1 T. salt
Pepper to taste
Coating
4 c. flour
salt and pepper to taste
Oil to fry

Place the chicken in a large bowl and add the salt and pepper. Mix it around so it coats the chicken pieces.  Pour the buttermilk over the chicken and let it sit for about an hour.  This tenderizes the chicken and gives it great flavor.
Mix the flour, salt and pepper in a bowl. You can get creative here; some people add cornmeal to their flour for crunch.  You can also add spices or even cayenne to give it some zip.  
After the chicken has marinated in the buttermilk, coat each piece in the flour mixture.   
Heat the oil in your skillet till it's hot. Add the chicken pieces and fry until golden brown or until the internal temperature of the chicken is 165 degrees.  Watch it so it doesn't burn....like I just did!

My Grandma served her fried chicken with mashed potatoes and milk gravy, fried okra, sliced tomatoes, bread and butter.

Finger-lickin' good!